
How to Make Some Fairy Chess Pieces
Bernard Hempseed
Making Pieces
One of the problems of playing fairy chess on a board is finding pieces that are different from the regular pieces so as not to cause confusion when playing. One solution has been to use some pieces from a completely different set, say a fantasy set, but this upsets the visual symmetry as any new pieces should ideally harmonise with existing pieces but be sufficiently different to be easily identifiable. Commercial fairy pieces don't seem to be readily available so the easiest solution is to make your own. Many people play regular chess with a standard "Staunton" design solid plastic set with a king height of around 95mm and these pieces are ideal to augment and use with the fairy pieces described below. Apart from one piece, the powers and names are not given as the owner can class them as he/she pleases.Firstly, obtain an identical solid plastic set. Additional items needed are; a hobby type fine bladed hacksaw, a file, and some quick setting two part epoxy glue. Five minute "Araldite" or similar works well. The object is to cut and rearrange some of the parts of the pieces to create new fairy pieces. While various other combinations are possible the ones described here are simple and easy to make. Each cut made should be perpendicular to the axis of the piece and after cutting, file off any rough edges or burrs.
The following describes one colour's pieces; repeat the process for the other colour. Although these instructions state to glue pieces as you go it is probably easier to cut all pieces first and then glue them.
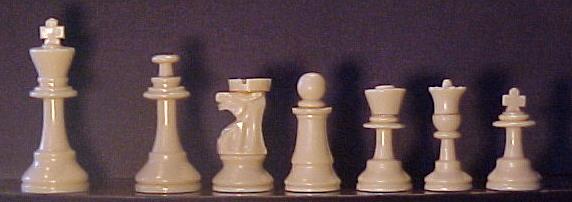
Piece 1. Take the Rooks. On each cut off about two thirds of the castelated part leaving about one third of the top on the base part. Care needs to be taken on this cut as it is the hardest one to do. Cut off two pawn tops just below the collar under the ball and glue these parts on to the rook bases.
Piece 2. Take each Knight and cut off the small protrubance above the ears. File this area flat and then glue on each the Rook top, previously cut off. It needs to be positioned so that most of the knight's nose is visible. The back of the new top should be in about the same line as the back of the base of the Knight. This piece obviously combines the power of a Rook and Knight and is known as a Chancellor or Minister
Piece 3. Take the King and Queen. On the King cut off the cross but leave the small circle just under it. Then cut off the King's head just above the top collar; i.e. at the point where the inwards sloping stops. On the Queen cut off the crown again just above the top collar. Take two Pawns and cut off the top balls and then cut off the stems about one third up from the base. This will leave two mushroom shaped pieces which are glued at the top of the King and Queen bases. Because of the unequal heights of the King and Queen the height of resulting pair of pieces are slightly different in height but it is not enough to be of concern.
The parts left over from the above may now be used to create three single pieces.
Piece 4. Take each Bishop and cut off the mitre just under the top collar. Glue on to the Bishop's base the King's head the normal way up.
Piece 5. Take the other Bishop's base and glue on the cross from the King.
Piece 6. Cut about one third off the top ball of a Pawn. Clue on to what is left the Queen's crown, again the normal way up.
After all this there will be (for each colour) three pairs of pieces and three single pieces. Three Pawns will be left over and these may come into use on larger boards such as 10 x 10 which are sometimes used. It would be unlikely that all these pieces would be used in a single game but by having a variety of pieces a variety of games may be played.
Improvising Non-Standard Chess Boards
One simple way of making non-standard sized chess boards (e.g. 10 x 8, 10 x 10 etc.) is to use a computer, spreadsheet program, and laser printer. Cell sizes can be extend both ways so experiment a little to create one cell of about 45mm square. Check by printing out a page and measuring the cell size. When the correct settings have been found duplicate them on to further cells. A block of 4 x 5 squares should fit on to an A4 sheet especially if the margins are adjusted. Shade alternative cells by using a fine pattern for the background. A pattern looks better than solid black. Put a narrow border around each cell. Print out sufficient copies, perhaps on cream paper, to make the board. Trim the sheets as required, and making sure the white corner square is in the correct place, glue them down to a piece of 10mm customwood or similar. Use a non-liquid glue, such as a glue stick, to stop cockles in the paper. Finally cover the board with a sheet of self-adhesive clear plastic. Make a different sized board on the back if desired.
Written by Bernard Hempseed.
WWW page created: February 22nd, 2004.